Site Pages:
404
Page not found :(
The requested page could not be found.
This is the base Jekyll theme. You can find out more info about customizing your Jekyll theme, as well as basic Jekyll usage documentation at jekyllrb.com
You can find the source code for Minima at GitHub: jekyll / minima
You can find the source code for Jekyll at GitHub: jekyll / jekyll

Authelia User Database Backend
The Authelia User Database is an authentication backend used for verifying user passwords and used to retrieve information such as email address and groups to which a user belongs. This database works in a harmony Authelia’s Access Control List (ACL) to control site access. ACL setup is discussed here.
The Authelia User Database contains entries specifc for each client: usename, password, group memberships, and email. The Authelia site administrator is responsible for creating user profiles with this infomation. There is no user “signup” portal. The user may change their password at any time after creation.
The database requires a working SMTP in order to function properly. Email is sent from Authelia’s host server to the client during the process of password changes and two-factor registration. Please see SMTP Mail Relay Setup for instructions on how to setup an email SMTP server that will forward email through Gmail if necessary.
The Authelia User Database is formatted as LDAP or as a simple file. To simply setup of the Authelia server this guide will use the “file” method. It would be possible to use an existing LDAP server or create a new Docker instance of an LDAP server if required.
Authelia User Database Setup
Please see the complete schematic of the directory tree for the layout of paths that will created on the host server. This section will create the /etc/authelia/config/users.yml file.
– ROOT WARNING: Please perform commands listed below as the root user (su/sudo)
Please create the following directory path:
$ mkdir -p /etc/authelia/config↲
An example users.yml file is shown below. You will need to create this file and populate it with data relevant to your particular setup. Groups names can be arbitray. Ensure the email address is valid. Password creation is discussed below.
###############################################################
#                         Users Database                      #
###############################################################
# This file can be used if you do not have an LDAP set up. All users passwords are 'password'.
users:
  john:
    password: "$6$rounds=500000$jgiCMRyGXzoqpxS3$w2pJeZnnH8bwW3zzvoMWtTRfQYsHbWbD/hquuQ5vUeIyl9gdwBIt6RWk2S6afBA0DPakbeWgD/4SZPiS0hYtU/"
    email: john.doe@authelia.com
    groups:
      - admins
      - dev
  harry:
    password: "$6$rounds=500000$jgiCMRyGXzoqpxS3$w2pJeZnnH8bwW3zzvoMWtTRfQYsHbWbD/hquuQ5vUeIyl9gdwBIt6RWk2S6afBA0DPakbeWgD/4SZPiS0hYtU/"
    email: harry.potter@authelia.com
    groups: []
  bob:
    password: "$6$rounds=500000$jgiCMRyGXzoqpxS3$w2pJeZnnH8bwW3zzvoMWtTRfQYsHbWbD/hquuQ5vUeIyl9gdwBIt6RWk2S6afBA0DPakbeWgD/4SZPiS0hYtU/"
    email: bob.dylan@authelia.com
    groups:
      - dev
  james:
    password: "$6$rounds=500000$jgiCMRyGXzoqpxS3$w2pJeZnnH8bwW3zzvoMWtTRfQYsHbWbD/hquuQ5vUeIyl9gdwBIt6RWk2S6afBA0DPakbeWgD/4SZPiS0hYtU/"
    email: james.dean@authelia.com
Hashed Passwords can be generated with following command: (Be sure to replace
sudo docker run authelia/authelia:latest authelia hash-password <yourpassword>
Be sure to take the generated hashed password and place it within the users.yml file. A password should be generated for each user within the users.yml file. Users may change this password later if desired.
Authelia is comprised of the following two components:
- The Athelia Registration Portal
- The Authelia Authentication Portal
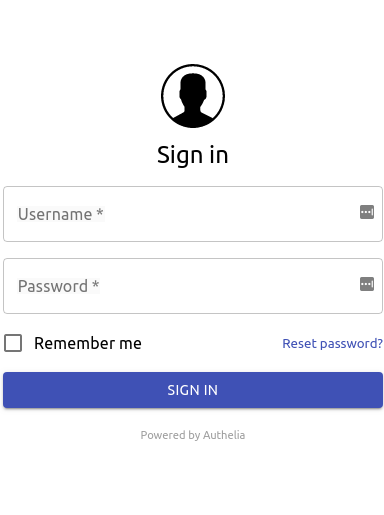
The Authelia Registration Portal
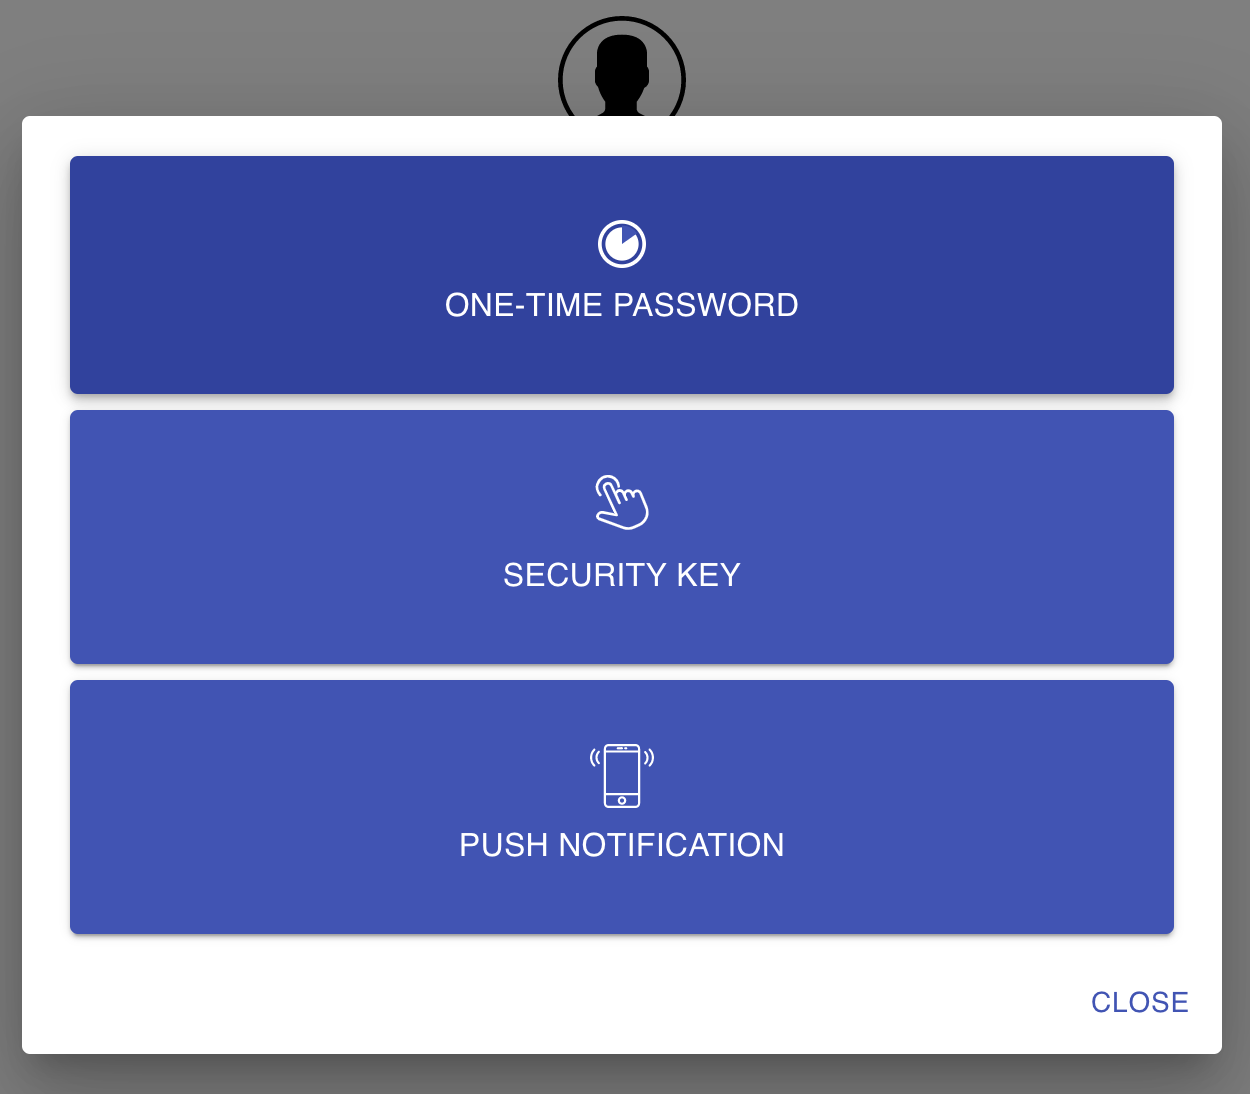
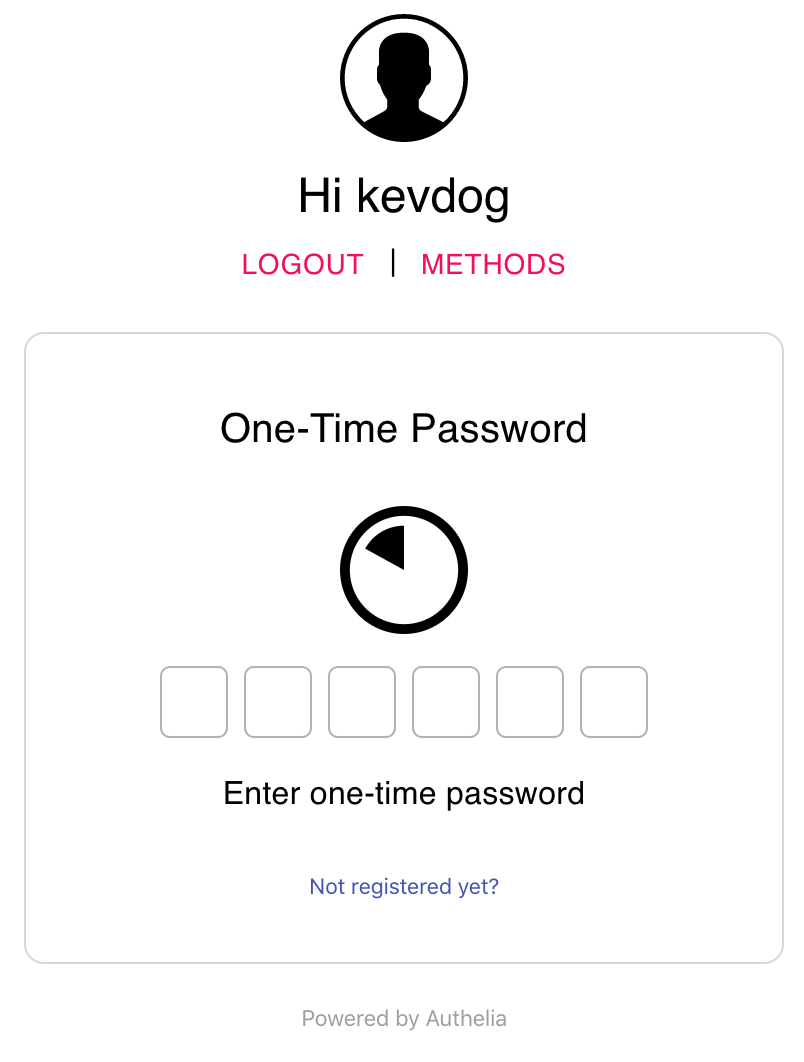
The Authelia Registration Portal is a locally hosted web application where clients will initially log in and activate their desired two factor authentication method(s). Clients will initially login with a username/password initially provided by the site administrator. Through the registration portal, users have the option of adding Google Authenticator, Duo Push and/or YubiKey as two factor authentication schemes. Creation of this user database is discussed below.
The Authelia Registration Portal appears similar to:

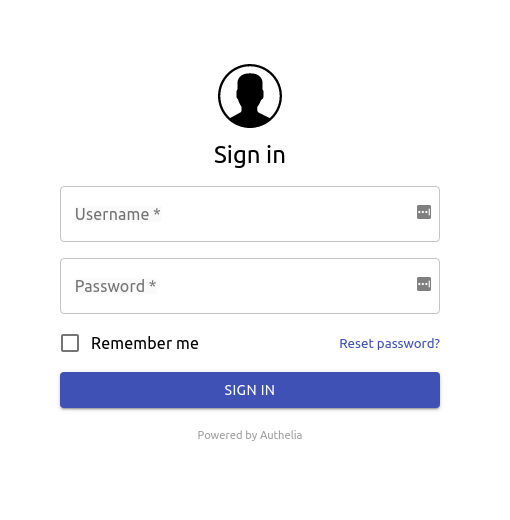
The Authelia Authentication Portal
In visiting domains/websites/applications that utilize Authelia for frontend authentication, clients are redirected to the Authelia Authentication portal to complete the authentication process. Clients are greeted with the familiar login screen as used with the registration portal. After logging in clients are directed to enter their second authentication credential if the domain/website/application was configured to require two-factor authentication. Domains/websites/applications can be configured through authelia to use single-factor authentication (Username/Password) with optional coupling of a two-factor authentication schemes (Google Authenticator, Duo Push and/or YubiKey). It is possible to setup multiple schemes in which the user may use one method as the second-factor authentication paramater.
The Authelia Authentication Portal appears similar to:
This is code
Directory Tree1,2
authelia
|-- etc
|   |-- authelia
|   |   `-- config
|   |       |-- configuration.yml
|   |       `-- users.yml
|   |-- docker
|   |   `-- compose
|   |       `-- authelia
|   |           |-- docker-compose.yml
|   |           `-- .env
|   |-- nginx
|   |   |-- nginx.conf
|   |   |-- snippets
|   |   |   |-- authelia.location.conf
|   |   |   |-- authelia.domain.com.cert.conf
|   |   |   |-- authelia_auth.conf
|   |   |   |-- authelia_proxy.conf
|   |   |   |-- ssl-modern-params.conf
|   |   |   |-- ssl-params.conf
|   |   |   |-- backend.domain.com.cert.conf
|   |   |   `-- internal-access-rules.conf
|   |   `-- vdomains
|   |       `-- backend.domain.com.conf
|   |-- systemd
|   |   `-- system
|   |       |-- docker-compose-reload@.service
|   |       |-- docker-compose-reload@.timer
|   |       `-- docker-compose@.service
|   `-- letsencrypt
|       |-- authelia.<domain.com>
|       |   |-- fullchain.pem
|       |   |-- priv.key
|       |   |-- chain.pem
|       |   `-- cert.pem
|       `-- <domain.com>-"Protected domain"
|           |-- fullchain.pem
|           |-- priv.key
|           |-- chain.pem
|           `-- cert.pem
`-- var
    `-- data
        |-- authelia
        |   `-- db.sqlite3
        `-- db
Courtesy: 1
Directory structure can be created via the following commands (Please run the commands with sudo or as root user):
mkdir -p /etc/authelia/config
mkdir -p /etc/docker/compose/authelia
mkdir -p /etc/nginx/snippets /etc/nginx/vdomains
mkdir -p /var/data/authelia /var/data/db
version: ‘3.7’
#networks:
docker_net:
ipam:
driver: default
config:
- subnet: 172.28.1.0/24
networks: net: driver: bridge
#volumes:
authelia-data:
external: true
services:
redis: container_name: redis restart: unless-stopped
image: redis:4.0-alpine
image: ‘bitnami/redis:latest’
image: ${REDIS_CONTAINER} #    command: redis-server --requirepass authelia_redis_pw #    ports:  #      - 6379:6379
expose:
  - ${REDIS_PORT}
networks:
  - net #      docker_net: #        ipv4_address: 172.28.1.3
environment:
  - TZ
  - REDIS_PASSWORD=${AUTHELIA_SESSION_REDIS_PASSWORD} #      TZ: 'America/Chicago' #      REDIS_PASSWORD: 'authelia_redis_pw'
db: container_name: mariadb
image: linuxserver/mariadb
image: ${MYSQL_CONTAINER}
restart: unless-stopped
environment:
  - PUID=1000
  - PGID=1000
  - MYSQL_ROOT_PASSWORD=${AUTHELIA_STORAGE_MYSQL_ROOT_PASSWORD}
  - MYSQL_DATABASE=${AUTHELIA_STORAGE_MYSQL_DATABASE}
  - MYSQL_USER=${AUTHELIA_STORAGE_MYSQL_USER}
  - MYSQL_PASSWORD=${AUTHELIA_STORAGE_MYSQL_PASSWORD}
  - TZ
networks:
  - net #      docker_net: #        ipv4_address: 172.28.1.2 #    ports: #      - 3306:3306
expose:
  - ${MYSQL_PORT}
volumes: #      - /var/data/db:/config
  - ${MYSQL_DATA_VOLUME}:/config
authelia: container_name: authelia hostname: authelia
image: authelia/authelia:latest
image: ${AUTHELIA_CONTAINER}
restart: unless-stopped
depends_on:
  - db
networks:
  - net #      docker_net: #        ipv4_address: 172.28.1.4
ports:
  - ${AUTHELIA_PORT}:${AUTHELIA_PORT} #    expose: #      - 8080
volumes:
  - ${AUTHELIA_CONFIG_VOLUME}:/etc/authelia/configuration.yml
  - ${AUTHELIA_USERS_VOLUME}:/etc/authelia/users.yml
  - ${AUTHELIA_USER_DB_VOLUME}:/var/lib/authelia/db.sqlite3 #      - /etc/authelia/config/configuration.yml:/etc/authelia/configuration.yml #      - authelia_config:/etc/authelia/configuration.yml #      - /etc/authelia/config/users.yml:/etc/authelia/users.yml
- authelia-data:/var/lib/authelia
- /var/data/authelia/db.sqlite3:/var/lib/authelia/db.sqlite3
environment:
  - TZ
  - NODE_TLS_REJECT_UNAUTHORIZED=0
  - AUTHELIA_JWT_SECRET
  - AUTHELIA_DUO_API_SECRET_KEY
  - AUTHELIA_SESSION_SECRET
  - AUTHELIA_NOTIFIER_SMTP_PASSWORD
  - AUTHELIA_SESSION_REDIS_PASSWORD
  - AUTHELIA_STORAGE_MYSQL_PASSWORD
$ apt postfix libsasl2-modules mailutils ca-certificates
This is a bash file without any markdown

Let’s Encrypt SSL Certificates
Let’s Encrypt provides users with free SSL certificates with a limitation that the certificates have to be renewed every 90 days. Because of this limitation it is recommended that an automated renewal process be utilized to automate the renewal process. ACME Clients that are recommended for obtaining and renewing certificat include CertBot or acme.sh.
Let’s Encrypt Validation Process
Let’s Encrypt requires user validation when issuing and renewing certificates. Let’s Encrypt needs to validate that control of the domain(s) for which are requesting certificates. Let’s Encrypt authenticates using challenges. “Challenge Types” include either HTTP challenge of DNS challenge.
HTTP challenge requires a file to be temporarily written/read on the requesting webserver. DNS challenge requires a temporary TXT record be added to your domain’s DNS records. Various DNS providers are compatible with Let’s Encypt. Of these two methods, I have found DNS-challenge to be more robust.
This guide will provide instructions on how to obtain SSL certificates through Let’s Encrypt. The DNS-challenge method will be used with Cloudflare as the DNS provider. acme.sh will be utilized as the ACME client. Additionally example systemd timer and service files will be provided if users would like to use this method to automated system renewals. Crontab or Fcron entries could be utilized as alternatives.
Let’s Encrypt Validation with DNS Challenge
For each domain requiring validaton, a corresponding A or CNAME record is required. Usually the base level domain is considered the A record. The A record is linked to an IP address. The CNAME records are linked to the A record. If utilizing a setup where one WAN IP Address is hosting multiple domains/subdomains, usually the A record is the basedomain and the CNAME recods are the subdomains of the basedomain which point to the A record and the same IP addresss.
For example:
| Type | Name | Content |
|---|---|---|
| A | example.org | 555.555.555.555 |
| CNAME | subdomain1.example.org | example.org |
| CNAME | subdomain2.example.org | example.org |
For every domain or subdomain that requires validation, there must be an A or CNAME entry.
For the domains listed above, it is possible to:
- Obtain 3 separate SSL certificates. Each SSL certificate contains only the name of itsh respective domain.
- Obtain 1 SSL certificate which contains the name of all three domains within the same certificate
Some refer to option 2 as obtaining a “SAN Certificate”. Whether you obtain multiple certificates or one certificate associated with multiple domains is a matter of personal preference.
If following this guide for Authelia setup, you must at least have either 2 certs, or 1 cert with 2 listed domains. The domains should be <domain.com> and authelia.<domain.com>
Please note that each subdomain does not need to be publicly accessible. It is possible to use subdomain2.example.org internally and for this particular domain to never be reachable from outside the Local Area Network.
Acme.sh Setup
– ROOT WARNING: Please perform commands listed below as the root user (su/sudo)
– VARIABLE SUBSTITUTION WARNING: Please substitute all enclosed <varible_names> with the appropriate value. For example: <email_address> would become joe@gmail.com
Official acme.sh installation instructions.
apt install git
pacman -S git cronie
$ cd ~
$ git clone https://github.com/acmesh-official/acme.sh.git
$ cd ~/acme.sh
$ ./acme.sh —upgrade —auto-upgrade
$ ./acme.sh —install —accountemail <email_address>
$ cd ~/.acme.sh
Acme.sh and Cloudflare
When working with Cloudflare, acme.sh requires either:
- The Cloudflare Global API Key Option —-OR—-
- The Cloudflare API Token Method Option
| Cloudflare Global API Key Option | Cloudflare API Token Method Option |
|---|---|
| Cloudflare Key -> CF_KEY | Cloudflare Token -> CF_Token |
| Cloudflare Email -> CF_EMAIL | Cloudflare Account ID -> CF_Account_ID |
You need criteria from either of the two columns. The Cloudfare Global API Key Option is the Legacy Option whereas the Cloudflare API Token Method Option is considered the newer option as options may be more finely tuned per user app.
When logged in Cloudflare and after selecting your particular domain, these criteria can be found at the following locations:
The Cloudflare Key is also known as the Cloudflare Global API Key. This is found under the My Profile -> API Tokens -> Global API Key Menu.
The Cloudflare Email is the email that was used when registering with CloudFlare when the account was created.
The Cloudflare Account ID can be found either:
- At the Bottom Right Column under “Account ID” when visiting the Overview Page for the specific DOMAIN
- Within the Browser URL bar – It the long alphanumeric code listed between https://dash.cloudflare.com/abkdkd-long-alpha-numeric-code-here-akk23939/<domain_name>
The Cloudflare Token Needs to be Generated:
- Goto My Profile -> API Tokens
- Select Create Token
- Give the Token a Name
- 2 Permissions are Needed:
- Zone Zone Read
- Zone DNS Edit
- Zone Resources - Include All Zones
- Copy the resultant long number given as it will not be able to retrieved again
You will need to export either pair of criteria as environmental variables for acme.sh to utilize their values.
$ export CF_Key="<Cloudflare Global API Key>"
$ export CF_Email="<Cloudflare Email>"
$ export CF_Token="<Cloudflare Token>"
$ export CF_Account_ID="<Cloudflare Account ID>"
Let’s Encrypt Certificate Generation with acme.sh and DNS Challenge with Cloudflare
For illustrative purposes, the Let’s Encrypt Certificates will be stored in /etc/letsencrypt/<domain_name>. Please modify instructions below for your setup.
$ export LE_DIR="/etc/letsencrypt/<domain_name>"
$ mkdir -p ${LE_DIR}
$ cd ~/.acme.sh
$ ./acme.sh --issue --dns dns_cf -d <domain_name>
$ ./acme.sh --install-cert -d <domain_name> \
> --cert-file ${LE_DIR}/cert.pem \
> --ca-file ${LE_DIR}/chain.pem \
> --key-file ${LE_DIR}/privkey.pem \
> --fullchain-file ${LE_DIR}/fullchain.pem \
> --reloadcmd "<reload command>"
The reloadcmd is optional. In many cases however after renewing certificates you may want to reload an application utilizing the certificates. In this particular application, ngnix is the reverse proxy utilizing the certifcates for the various domains. To automatically reload the new certificates within Nginx, the reloadcmd would be --reloadcmd "nginx -s reload". If multiple reload commands are needed, put them in a shell script and have the reloadcmd call the shell script.
Let’s Encrypt Certificate Auto Renewal
By default, acme.sh will create an entry into the root crontab. Certificate renewal will be attempted nightly. The crontab entry will appear similar to:
$ crontab -l  #<---(Use fcrontab -l if using fcron as cron implementation rather than vixie,cronie)
2020-03-18 01:51:47  INFO listing root's fcrontab
22 0 * * * "/root/.acme.sh"/acme.sh --cron --home "/root/.acme.sh" > /dev/null
Optional Renewal Implementation with Systemd Timers rather than using crontab
I’ve personally attempted to convert most of my crontab entries into corresponding systemd unit files and timers.
I first commented out the acme entry contained within the crontab file, and then created two files:
- acme_letsencrypt@.service
- acme-letsencrypt@.timer
Both these files for me were placed within /etc/systemd/system however please check your distribution for the exact location.
[Unit]
Description=Renew Let's Encrypt certificates using acme.sh for %I
After=network-online.target

[Service]
Type=oneshot
ExecStart="/root/.acme.sh"/acme.sh --home "/root/.acme.sh" --cron --issue --dns dns_cf -d %i --log
[Unit]
Description=Daily renewal of Let's Encrypt's certificates

[Timer]
OnCalendar=daily
RandomizedDelaySec=1h
Persistent=true

[Install]
WantedBy=timers.target
With this setup, the timer will start the service file to renew the certificate(s).
Timers can be enable to start at boot and started by:
systemd enable acme_letsencrypt@<domain_name>.timer
systemd start acme_letsencrypt@<domain_name>.timer
So for example if domain_name=example.org
systemd enable acme_letsencrypt@example.org.timer
systemd start acme_letsencrypt@example.org.timer
Use systemctl list-timers to see status of timers, last run, etc.


Nginx Setup with Authelia
Samuel Dowling’s Nginx Reverse Proxy Guide1 is a very good resource on how to setup and configure nginx as a reverse proxy. Based on his recommendation, I’m using his structure as a guide how to configure nginx for this guide.
The basic layout for nginx for this guide is the following:
/etc/nginx
|-- vdomains
|   |-- authelia.<domain.com>
|   `-- <domain.com>
|-- snippets
|   |-- authelia.location.conf
|   |-- authelia.<domain.com>.cert.conf
|   |-- authelia.<domain.com>.conf
|   |-- authelia_auth.conf
|   |-- authelia_proxy.conf
|   |-- ssl-modern-params.conf
|   |-- ssl-params.conf
|   |-- <domain.com>.cert.conf
|   |-- <domain.com>.conf
|   |-- proxy-ssl.params.conf
|   `-- internal-access-rules.conf
`-- nginx.conf
At least two virtual domains need to be configured:
- authelia.<domain.com>
- <domain.com>
authelia.<domain.com> = the authelia registration and authentication portal
<domain.com> = the domain/web application that utilizes authelia as an authentication frontend..
- Multiple domains/sites can utilize authelia for frontend authentication depending on the reverse proxy configuration.
- Examples of type of locations which utilize authelia as a frontend
- Top Level Domains: domain.com, yourdomain.org, happiness.biz
- SubDomains: subdomain1.domain.com, whereis.yourdomain.org
- Folders: domain.com/admin, yourdomain.org/lost/img
Example Configuration
Please adapt to your setup, particularly if you have a pre-existing configured nginx reverse proxy.
My main /etc/nginx/nginx.conf file is very basic. All the virtual domains are included within the /etc/nginx/vdomains folder and includes are located within the /etc/nginx/includes folder.
nginx.conf
worker_processes  1;

events {
    worker_connections  1024;
}

http {
    include mime.types;
    default_type application/octet-stream;
    sendfile on;
    keepalive_timeout 65;

    log_format  main  '$remote_addr - $remote_user [$time_local] "$request" '
	                    '$status $bytes_sent "$http_referer"'
                      '"$http_user_agent" "$http_x_forwarded_for"';

    types_hash_max_size 4096;

    # Redirect all HTTP traffic to HTTPS
    server {

        listen 80 default_server;
        listen [::]:80 default_server;

        return 301 https://$host$request_uri;
    }

    # Import server blocks for all subdomains
    include "vdomains/*.conf";
}
authelia.<domain.com> virtual domain file
Located at: /etc/nginx/vdomains/authelia.<domain.conf>
Example Domain which utilizes authelia as an authentication frontend - <domain.com>
The full example file is found here: authelia.domain.com.conf
Below are two types locations that authelia could provide authentication services for:
- Top Level Domain
- Subfolder of the Top Level Domain
...
...
# Top Level Domain Example

       location /{
          #auth_basic "Private";
          #auth_basic_user_file /etc/nginx/private/admin.scr;

           include snippets/proxy-ssl-params.conf;
           #include snippets/internal-access-rules.conf;

           set $upstream_bw https://<domain.com>:443;
           proxy_pass $upstream_bw;
           include snippets/authelia_auth.conf;
           include snippets/authelia_proxy.conf;
           #proxy_redirect off;
       }
...
...
# Protected Subfolder Location of the Top Level Domain

       location /admin {
		       #auth_basic "Private";
		       #auth_basic_user_file /etc/nginx/private/admin.scr;

		       include snippets/proxy-ssl-params.conf;
           #include snippets/internal-access-rules.conf;

		       set $upstream_bw https://<domain.com>:443;
    		   proxy_pass $upstream_bw;
		       include snippets/authelia_auth.conf;
		       include snippets/authelia_proxy.conf;
		       #proxy_redirect off;
	      }
...
...
In setup above, the protected domain/subfolder is https://<domain.com>/admin. No auth_basic, or auth_basic_user_files are needed since authelia is going to be performing the authentication for the site. proxy-ssl-params.conf - Includes parameters since this reverse proxy is going to be re-encrypting the connection to the backend. These parameters will control the re-encryption. This file is not needed if the reverse proxy is terminating the SSL encryption and passing unencrypted to the backend internal-access-rules.conf - Include if wanting to control access from the site from various IP addressess $upstream-bw - This variable sets the location of the backend encrypted domain. An http or https transport layer may be utilized depending if there are SSL certificates for the backend. With no certificates this variable would be: http://backend.<domain.com>:80 authelia_auth.conf, authelia_proxy.conf - Parameters needed by the authelia authentication portal
server {
    listen         80;
    server_name    authelia.<domain.com>;
    return         301 https://$server_name$request_uri;
}

server {
    listen [::]:443 ssl http2;
    listen      443 ssl http2;
    server_name authelia.<domain.com>;

    access_log /var/log/nginx/authelia.<domain.com>.access.log main buffer=32k;
    error_log /var/log/nginx/authelia.<domain.com>.error.log warn;

    include snippets/authelia.<domain.com>.cert.conf;
    include snippets/ssl-params.conf;

    location / {

        # If ngnix is run within a docker container, the following line would be
        # set $upstream_authelia http://authelia:8080.-> Please adjust port number to
        # port number which is specified for the authelia service within docker-config.yml

        set $upstream_authelia http://authelia.<domain.com>:8080;
        proxy_pass $upstream_authelia;
        include snippets/authelia_proxy.conf;
    }
}
{* include nginx.conf.txt *}
Page Links
Authelia is an open-source applicationthat provides 2-factor authentication and single sign-on (SSO) for web based applications.
Authelia is a Docker-based application that sits between a reverse proxy and a web application. Authelia provides “frontend” authentication for the “backend” web application/service.
The authentication scheme(s) which can be utilized are a username/password and optionally coupled with a two-factor mechanism – Google Authenticator, Duo Push Notifications, or YubiKey.


The purpose of this document is to explain how to setup and implement an Authelia portal for a backend application.
Initial Requirements
It is assumed there is an existing framework in place in which the backend application is currently accessible behind a reverse proxy. This framework would appear similar to:
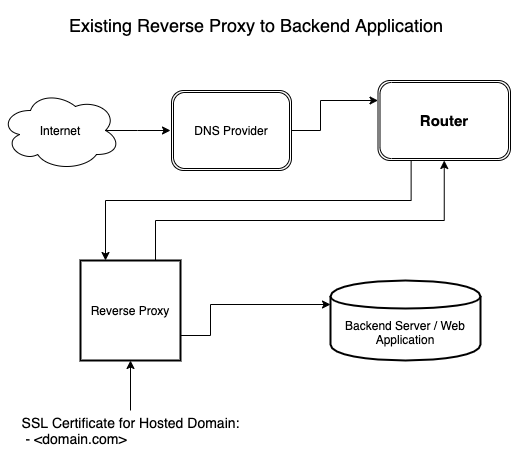
Instructions on how to configure a reverse proxy for your web application to fulfill the initial requirements are discussed in here.1
Although not an absolute requirement, it is recommended SSL certificates are utilized for the hosted domain.
Completed Setup
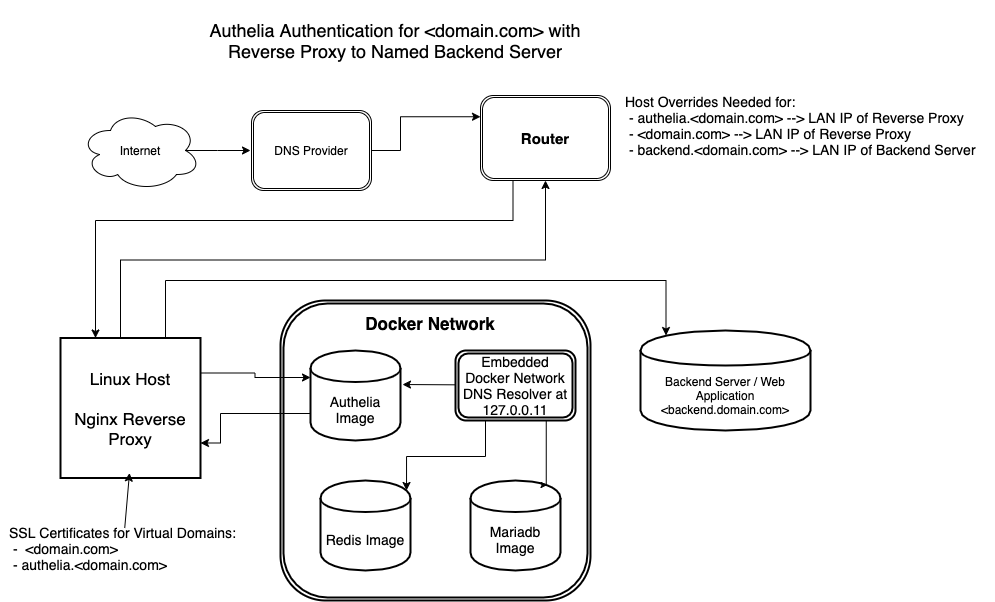
After completing the steps in this guide, the framework should appear similar to:
Guide Parameters and Limitations
This guide will:
- Discuss the Authelia Application
- Configure a linux based Nginx Reverse Proxy in order to use Authelia for frontend authentication
- Configure a Docker Setup consisting of authelia, redis and mariadb images as required by Authelia
- Discuss the concept of DNS Host Overrides and discuss setting up DNS Host Overrides at the Host or Router Level so host name resolution will work for the configured setup.
This guide will not cover:
- Router level port forwarding
- Firewall configuration either at the Router or Host Level.
Given the initial starting point, I am assuming the end-user has configured router level port forwarding and router/host firewall in order to allow access to the hosted web application without the frontend Authelia authentication scheme.
Compatibility
This guide should be applicable with slight modifications to all systems capable of running docker containers.
This guide was constructed using the following reference system
Reference Files
All configuration files used in this guide may be found here
In configuring Authelia, at least 2 or more sites need to be configured within the reverse proxy:
 1. The Authelia Portal
 2. One or more Protected Sites or Protected Domains/Subdomains/Folders
The Authelia Portal
The Authelia Portal is a website where users will initially log in to register and activate the two factor authentication method. Users will login with a given username/password and then register with the Google Authenticator app or Duo Push app. Users are sent an email to confirm the registration during this process.
The Authelia Portal appears similar to:
Protected Site(s)
Once registered, users will have the ability to access specific Protected Sites or Domains using their registered authentications scheme. When a user attempts to access the URL of the protected site, the user will be redirected to the authelia portal. Users will need to authenticate with a username/password along with either a Google Authenticator Code, Duo Push Notification or YubiKey if two-factor authentication is configured for the Protected Site. Once authenticated within authelia, the user will be redirected to the Protected Site. Below shows two screenshots for authenticating with a Goggle Authenticator code and a Duo Push Notification.
The page number is: 99
Checklist
- Obtain a FQDN for each “Protected Domain” and authelia.<domain.com>
- Add authelia.<domain.com> to your DNS records
- Obtain SSL certificates for authelia.<domain.com> and for Protected Domains
- Configure Router to Open Ports 80/443 and forward to packets to server running reverse proxy
- Configure host server running reverse proxy to forward packets to docker (check kernel and network settings)
- Adjust firewall settings on router and server running reverse proxy to allow for incoming traffic.
Syntax
This document will often make reference to variable or locations which are surrounded by <…..>. This is an instruction to substitute the your actual name or variable value in this location. This includes substitution of the brackets and all characters in between the brackets.
For example, the value authelia.<domain.com> is an instruction for you to substitute your actual domain name for the bracketed portion - ie -
authelia.google.com or
authelia.yahoo.com or
authelia.YOUR_DOMAIN_NAME.com
Details:
- Fully Qualified Domain Name
- Ability to Access and Alter DNS records
- Ability to Obtain SSL Certs for Domain
- Linux Server or Virtualized Linux Server
- Basic Knowledge of How to Configure a Reverse Proxy for Domain
- Adjust firewall ports to allow for ingress of traffic on ports 80/443y
- Kernel level port forwarding
- Docker nuances with iptables/ufw
Fully Qualified Domain Name
The User must have a Fully Qualified Domain Name. Domain Names are CHEAP!!!. There are many Domain Name Registrars where it’s possible to obtain and lease a domain name. There are also services that offer domain names for free (ie no-ip.com), however these are usually subdomain rather than top-level domain names (tld’s). I would recommend a tld domain if possible however a free domain name could also be used.
Ability to Access and Alter DNS records
DNS providers associate your Domain Name with a server IP address. In many cases a DNS registrar may be the same provider the offers DNS services for your domain.
For purposes of this guide you must have the ability to add a domain name to your DNS records that will resolve to the server IP where authelia and your reverse proxy is located. For purposes of this guide, I will refer to authelia.<domain.com> as the name associated with your authelia installation. <domain.com>=your individual domain name.
Please add an entry for with your DNS provider in order to complete the installation successfully.
I personally use Cloudflare as my DNS provider. The service is free, quick, and changes quickly propogate after DNS records are offered.
Ability to Obtain SSL Certs for Domain
Although this guide does not specifically provide instructions how to obtain SSL certs, it requires that your have:
1. A SSL certificate for your **Protected Domain(s) or Subdomain(s)**
2. An SSL certificate will be need to be obtained for the
   Authelia Portal - authelia.<domain.com>.
I personally recommend Let’s Encrypt for SSL certificates. The service is reliable and free with the condition you must renew your certificates every 90 days.
I also recommend the acme.sh or cerbot client software to obtain and automatically renew your Let’s Encrypt SSL certificates. This guide unfortunately does not cover how to use these programs to obtain the certificates or how to configure these programs for automated renewal of the certificates.
Linux Server or Virtualized Linux Server
All configurations of this guide were tested on an Arch Linux server. Instructions of this guide should be applicable with very minor modifications to any linux system. Linux was chosen because of its ability to run docker containers. I personally run my setup within a byhve virtual machine (VM) running on FreeNAS which runs on FreeBSD. Any system capable of virtualizing a linux installation (KVM, Proxmox, Xen, XCP-NG, VirtualBox, etc) should be able to run Authelia via instructions in this guide
Basic Knowledge of How to Configure a Reverse Proxy for Domain
This guide focuses on how to configure Nginx for authelia. There are many reverse proxies which could be used (Traefik, Caddy, HAProxy, etc.) Configuration of the headers for each reverse proxy will be sligthly different. Nginx is the only system I’ve tested with Authelia. Authelia also officially supports the Traefik revere proxy.
I’m assuming those interested in using this authentication scheme have already configured their own website(s) using either Nginx/Apache. If you have some knowledge of how to work with nginx and provide https access to a virtual domain, this guide should be straightfowrard.
This guide will provide instructions how to setup authelia.<domain.com> as a virtual domain on nginx.
Adjust firewall ports to allow for ingress of traffic on ports 80/443y
Firewall ports may need to be opened on ports 80/443 on the computer running the Nginx/Authelia applications. Please check your configuration for iptables or ufw if you are using such tools on your linux distribution.
If you are self-hosting, your router settings will need to be adjusted to forward ports to 80/443 to the internal server running the reverse proxy. With some routers, (i.e. pfsense) the firewall may also be need configured to allow for passage of traffic on port 80/443 to the host system.
Kernel level port forwarding
The host system will need to be configured to allow kernel-level packet forwarding to the docker network and to the instance of authelia which runs within the authelial docker container. Ipv4 forwarding needs likely needs to be:
- Enabled within the system kernel kernel_ipv4_activation and
- Possibly Enabled within the network settings if using systemd-networkd, (not including netpland), An example systemd-networkd configuration file is listed below which is usually located within /etc/systemd/network/1,2,3
Reference File 20-wired.network
[Match]
#Name=enp0s4
Name=eth0

[Network]
DHCP=ipv4
DNS=10.0.1.1
IPForward=kernel
Docker nuances with iptables/ufw
The docker daemon directly manipulates the host’s iptables. If using ufw as a frontend for iptables, this behavior may not be wanted or favorable since it may expose host services running on the same ports as the forwarded docker ports. Please consult ufw-docker-discussion for discussion on how to possibly remedy this situation. I personally have not tested these instructions, however if running on a production server, these instructions may be helpful.
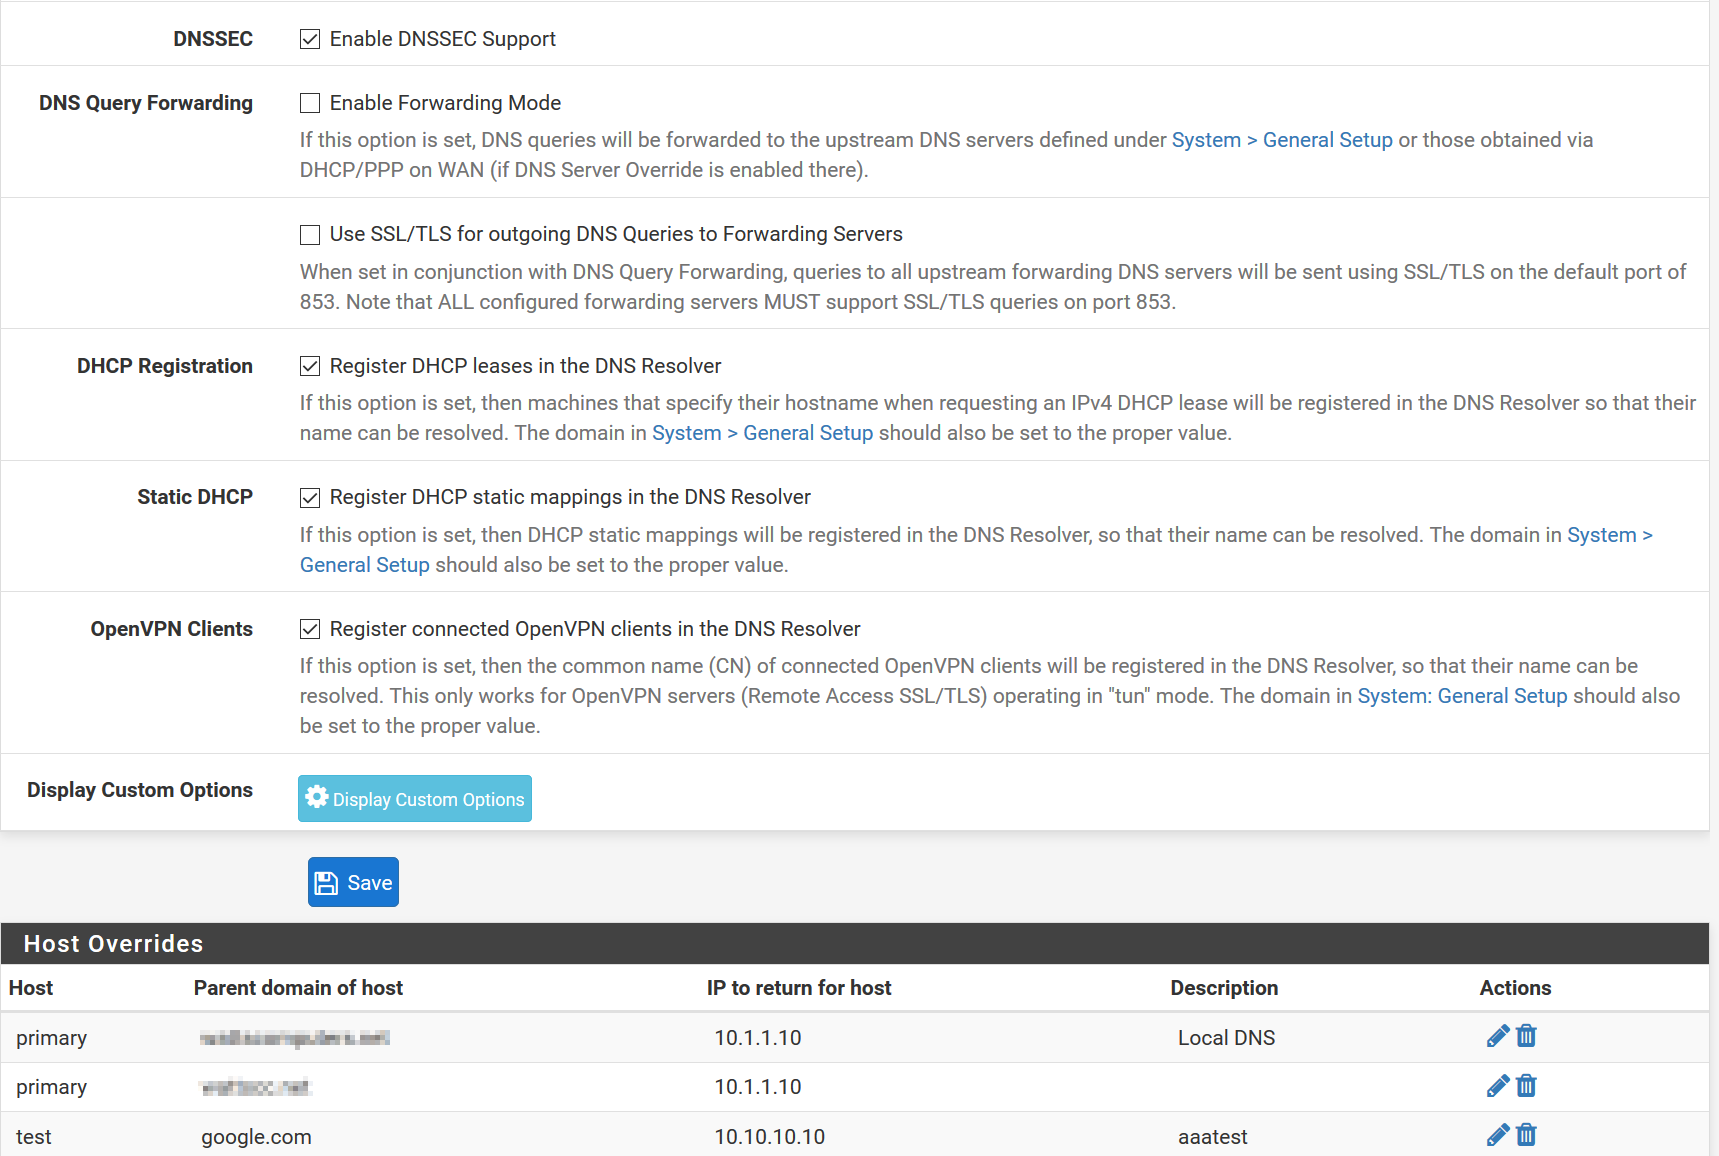
BaseURL:
Reference Files:
-
Authelia Configuration Files
- configuration.yml - Main Authelia Configuration File
- .env - Authelia Environment Variables and Passwords
- users.yml - Example User Database File
-
Authelia Nginx Configuration Files
- authelia.domain.com.cert.conf - Let’s Encrypt SSL parameters for Authelia Main Site
- authelia.domain.com.conf - Nginx Virtual Domain File for authelia.domain.com
- authelia.location.conf - Authelia Headers to Protect BackendDomain
- authelia_auth.conf - Authelia Authentication Headers for Backend Domain
- authelia.proxy.con - Authelia Reverse Proxy Headers
-
Example Nginx Configuration Files
- ssl-modern-params.conf - Modern Nginx SSL Configuration
- ssl-params.conf - Intermediate Nginx SSL Configuration
- nginx.conf - Basic Nginx Main Configuration
-
Docker Configuration Files
- docker-compose.yml - Docker Compose File for All Docker Related Images
-
Systemd Service Files
- docker-compose@.service - Docker Compose systemd Service File
- docker-compose-reload@.service - Docker Compose systemd Reload Service File to Automatically Reload Docker Images
- docker-compose-reload@.timer - Docker Compose systemd Reload Timer File to Automatically Reload Docker images
Systemd-networkd
Reference System Specification
- Arch Linux Version: 5.4.21-1-lts
- Arch Linux VM with zfs on Root
- Nginx Version: 1.17.8
- OpenSSL Version: 1.1.1d 10 Sep 2019
- Docker Version: 19.03.6-ce, build 369ce74a3c
- Docker Compose Version: 1.25.4
Configuration
Host System Setup
- Nginx Reverse Proxy
- Docker - controlled via Docker Compose
Docker
All the docker images are hosted on Docker Hub
- authelia/authelia
version: authelia:latest
- linuxserver/mariadb
version: linuxserver/mariadb:latest
Comment: MariaDB being utilized as there exists a compatibility issue with formal mySQL dataabase container
- bitnami/redis
version: bitnami/redis:latest
Comment: Container chosen due to ability to pass Redis password as ENV variable
Volumes on Host System Mounted within Docker Containers
| Host Directory/File | Container | Container Mount Point |
|---|---|---|
| /etc/authelia/config/configuration.yml | authelia | /etc/authelia/configuration.yml |
| /etc/authelia/config/users.yml | authelia | /etc/authelia/users.yml |
| /var/data/db/ | mysql | /config |
Configuation Files
-
Authelia
-
configuration.yml - Main Authelia Configuration File - Raw File
-
users.yml.COMPLETE_EXAMPLE - A More Complete Sample User Database file - Raw File
-
-
Docker
-
.env - Authelia’s Docker’s Environment Variables and Parameters - Raw File
-
docker-compose.yml - Authelia’s Docker Compose File - Raw File
-
-
Systemd-networkd
- 20-wired.network - Network Configuration for for systemd-networkd - Raw File
-
Postfix
-
Nginx
-
authelia.domain.com.cert.conf - Nginx Authelia SSL certificate Block - Raw File
-
domain.com.cert.conf - Nginx <domain.com> SSL certificate Block - Raw File
-
authelia.domain.com.conf - Authelia’s Ngnix Virtual Domain Configuration File - Raw File
-
authelia.location.conf - Authelia’s Virtual Endpoint created for Ngnix to Forward Auth Requests - Raw File
-
authelia_auth.conf - Authelia’s Nginx Authentication Headers for Virtual Domain - Raw File
-
authelia_proxy.conf - Authelia’s Ngnix Reverse Proxy Configuration Header Directives - Raw File
-
<domain.com>.conf - The “Protected Domain’s” Nginx Virtual Domain Configuration File - Raw File
-
proxy-ssl-params.conf - Proxy Parameters to Re-Encrypt connection to Backend/Upstream Servers - see https://docs.nginx.com/nginx/admin-guide/security-controls/securing-tcp-traffic-upstream/ - Raw File
-
nginx.conf - Example Main Configuration File for nginx - Raw File
-
ssl-modern-params.conf - Nginx Modern SSL configuration - see https://ssl-config.mozilla.org/ - Raw File
-
ssl-params.conf - Nginx Intermediate SSL configuration - see https://ssl-config.mozilla.org/ - Raw File
-
-
Systemd
-
docker-compose-reload@.service - Authelia’s systemd service configuration file to automatically reload/refresh Authelia’s Docker Images - see docker-compose-reload@.timer] - Raw File
-
docker-compose-reload@.timer - Authelia’s systemd timer configuration file to automatically reload/refresh Authelia’s Docker Images - Raw File
-
docker-compose@.service - Authelia’s systemd service configuration file to start/stop/reload Authelia’s docker-compose.yml - Raw File
-
Reverse Proxy Overview
Reverse proxies provide a method to be able to host multiple websites or multiple web services utilizing a single IP address.
In order to function properly, reverse proxies need coordination with an External Domain Name Service (such as Google, OpenDNS, Cloudflare) and with a Local Domain Name Server which will resolve LAN server host names to LAN IP addresses.
If a reverse proxy proxies for multiple domains/subdomains that are accessible external to the LAN, each domain name should be registered with a DNS provider which provides a domain name –> WAN IP address mapping. In the scenario where one reverse proxy is utilized,, the domains/subdomains will map to the same WAN IP address. In configuring DNS records at your DNS provider, subdomains are usually entered as CNAME records and TLD (Top Level Domains) are usually entered as A records. Records must be configured properly so the domains resolve to the WAN IP address of the Reverse Proxy.
The reverse proxy’s function is to “distribute” all incoming requests to the appropriate backend service/server associated with a particular domain name. The reverse proxy listens for connections on specfic network interface and ports, analyses network headers, and then fowards requests to the appropriate backend server or application.
This documentation will utilize Nginx as the reverse proxy implementation. When utilizing Nginx each domain associated with the reverse proxy is known as a virtual host. Each nginx virtual host has it’s own separate configuration paramaters. The setup instructions in this guide create a separate configuration file for each of nginx’s virtual host.
Reverse Proxy and SSL Management
In addition to forwarding connections to the appropriate backend server, a reverse proxy may also provide SSL capabilities for transport layer encryption/decryption. Reverse proxies may function as a
- SSL terminating proxy
- SSL Pass-through proxy
- SSL terminating and Re-Encryption Proxy where connections are decrypted at the reverse proxy and then re-encrypted to the backend server.
SSL terminating proxies are probably the most common type of reverse proxy. These proxies will offload the SSL encrypted connection and pass the connection unencrypted to the backend server usually residing on the same LAN or a (V)LAN where the risk of traffic snooping is very low. Many applications are designed purposely to work in concert with a front-end reverse proxy so the reverse proxy will handle all the transport layer encryption and de-encryption. SSL terminating proxies also make SSL certificate management easier, since the SSL certificates for all the virtual domains hosted by the reverse proxy can be kept in one location.
SSL pass-through proxies are reverse proxies which do NO SSL Offloading and pass the encrypted connection directly to the backend. The backend system is responsible for SSL offloading and for SSL certificate management.
SSL terminating and Re-encryption Proxies are a combination of the two methods. The reverse proxy will terminate the original encrypted connection and then re-encrypt with a different certificate. In many cases, systems may use a combination of SSL certificates obtained from an established certificate agency (Let’s Encrypt, Verisign), and self-sign SSL certificates for the internal backend connections. Nginx refers to this re-encryption as encryption to “Upstream Servers”
This guide will discuss the implementation of an SSL terminating and SSL terminating/re-encrypting proxy.
LAN Name-Based Server to LAN IP Address Mapping
Nginx can proxy to name-based servers. The following is an excerpt
Similar to external DNS providers which provide mapping of domain names to WAN IP addresses, there must also be a mapping of named-based LAN server to LAN IP addresses for reverse proxies to correctly function. LAN servers may either be identified directly by IP Address or by Name. A reverse proxy such as nginx may proxy connections to backend servers based on local IP address or domain names. .
LAN Servers identified by IP address
A SSL offloading reverse proxy which forwards based on a LAN IP address is shown below:

An example nginx configuration file for an nginx virtual domain the proxies to a specific LAN IP addrress is shown below:
  server { # simple reverse-proxy
    listen       80;
    server_name  domain2.com www.domain2.com;
    access_log   logs/domain2.access.log  main;

    # serve static files
    location ~ ^/(images|javascript|js|css|flash|media|static)/  {
      root    /var/www/virtual/big.server.com/htdocs;
      expires 30d;
    }

    # pass requests for dynamic content to rails/turbogears/zope, et al
    location / {
      proxy_pass      http://192.168.1.10:8080;
    }
  }
In the example above, nginx will forward the incoming connection to the backend server identified by 192.168.1.10.
LAN Servers Identified by Name
Similar to DNS providers, a locally implemented name-based identification scheme must create a mapping between the servers’ host names and their LAN IP addresses. The mapping of LAN IP addresses to LAN names can be accomplished at the “router level” or at the “host level”.
Host Level Mapping
“Host level” mappings are managed through making modifications to the host server’s /etc/hosts file. An example /etc/hosts file is shown below:
192.168.56.1   ubuntu.tecmint.lan
192.168.56.10  centos.tecmint.la
The /etc/hosts file is a one to one mapping of LAN IP addresses to LAN host names. In the instance of when docker container virtualization is utilized on the host machine, the host’s/etc/hosts file will be shared with the docker network. The use of /etc/hosts files may be problematic particularly if there are multiple servers within the LAN. Each server maintains it’s own /etc/hosts file. Synchronizing /etc/hosts files between hosts may be difficult given a large network.
Router Level Mapping
“Router level” host name mapping is done by the network router. This scheme may be advantageous since the (host name)–(LAN IP address) mapping occurs at one location. Depending on the type of router, each router may be configured to either use NAT reflection or Host Overrides to peform this mapping..
Host Override configuration is very similar to configuring /etc/hosts:
When implementing a “Router Level” hostname mapping scheme, I usually:
- Make a Host Override entry for each server running on the LAN
- Make a Host Override entry for each virtual domain referenced in the reverse proxy setttings
Nginx can reverse proxy according the host name as long as a correct Local Host Name–>LAN IP Address has been appropriately configured. Below is an an excerpt from a virtual host block that demonstrates proxying by name:
    location / {
      proxy_pass      http://backend.domain.com:8080;
    }
Docker and Name-Based <–> IP address Mapping
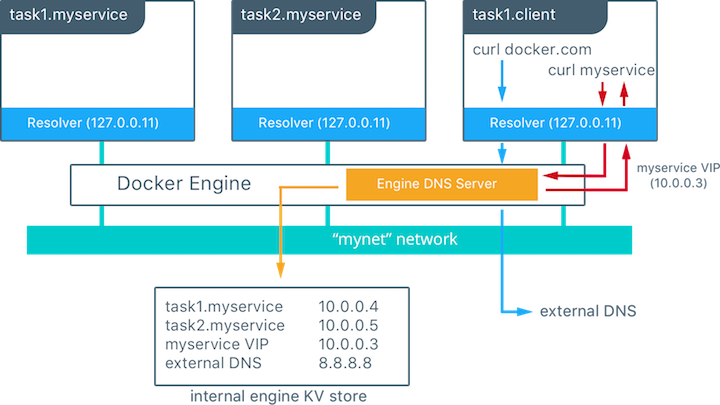
Docker creates create containers from docker images. Usually one image runs inside each docker containers. Docker creates a “Docker Local Area Network” with an embedded docker DNS server. The address of the embedded DNS server by defaultis 127.0.0.11. If containers are started with names, docker containers can communicate with each other by docker-container name rather than docker container IP address. The docker DNS server is also capable of resolving server names outside the docker network. It will receive a copy of the host’s /etc/hosts file upon initialization and it can also query local and external DNS server.
For this tutorial, I will be referencing setup similar to the diagram below:
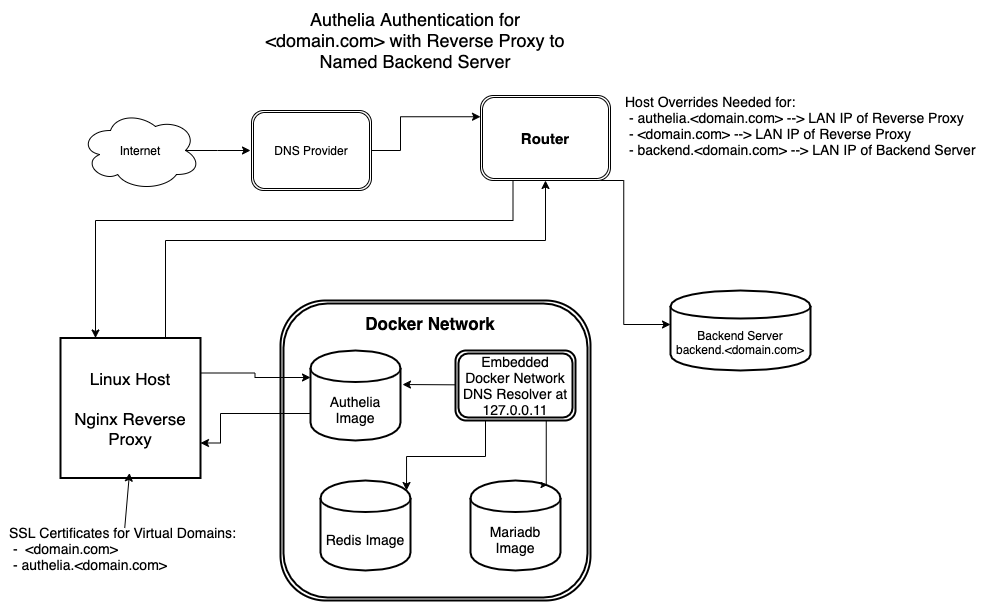
For simplicity, this guide operates according to the following parameters:
- The name of the domain requiring frontend authelia authentication is <domain.com>
- The frontend authelia registration portal is authelia.<domain.com>
- backend.<domain.com> is the name of the backend server where the connections will be forwarded after authentication. The actually backend server could represent a variety of applications – ie nextcloud, a docker container, bitwarden server, backend web server for sensitive information, etc.
- Ensure Host Overrides have been created at the “Router Level” or “Host Level” to map the host names of authelia.<domain.com>, <domain.com>, and backend.<domain.com> to their respective LAN IP addresses
- authelia.<domain.com> and <domain.com> should be mapped to the LAN IP address of the reverse proxy.
- backend.<domain.com> should be mapped to the LAN IP address of the backend server.
- If desiring to host domains that are internet accessible, please ensure:
- A/CNAME records exist for authelia.<domain.com> and <domain.com> registered at your DNS provider. The records should point to the WAN IP address of the reverse proxy.
- SSL certificates have been obtained for both authelia.<domain.com> and <domain.com>. These certificates should be installed on the linux reverse proxy host within the respective /etc/letsencrypt/authelia and /etc/letsencrypt/<domain.com> directories.1
-
Obtaining and utilizing SSL certificates are recommended even if hosting internal domains that are accessible only within the LAN as compared to external domains that are accessible to the entire internet. If using Let’s Encrypt certificates, I would consider registering these internal domain names with a DNS-challege-validation-compatible DNS provider that integrates with either certbot or acme. Using DNS-challenge-validation greatly simplifies the SSL certificate renewal process. DNS-challenge-validation can be utilized even for domain certificates that are intended only to be used internally. ↩
Site Pages:{{ site.pages }}


SMTP Email Relay Setup
Authelia requires sending email to users when setting up two-factor authentication. Unless there is already a mail server or mail relay running within your domain, this guide is a quick primer on how to setup a local mail relay to forward e-mails through Gmail’s smtp servers. This guide demonstrates how to setup Postfix as a Mail Transfer Agent (MTA) in order to send mail from the Authelia’s host server.
- docker_net:
- ipam:
- driver: default
- config:
- - subnet: 172.28.1.0/24
- authelia-data:
- external: true
- image: redis:4.0-alpine
- image: ‘bitnami/redis:latest’
- image: linuxserver/mariadb
- image: authelia/authelia:latest
- - authelia-data:/var/lib/authelia
- - /var/data/authelia/db.sqlite3:/var/lib/authelia/db.sqlite3
| {% capture text %}{% include become_root_warning.md %}{% endcapture %}{{ text | markdownify }} |
Package Installation
Install postfix and accompanying packages for your linux distribution. Commands for Ubuntu and Arch are listed below. If you are using other linux distributions, package names may be different. Consult your distribution’s repository pages to try to find the corresponding package.
Postfix Configuration
When installing the postfix package, you’ll be greeted with a screen similar to the following:
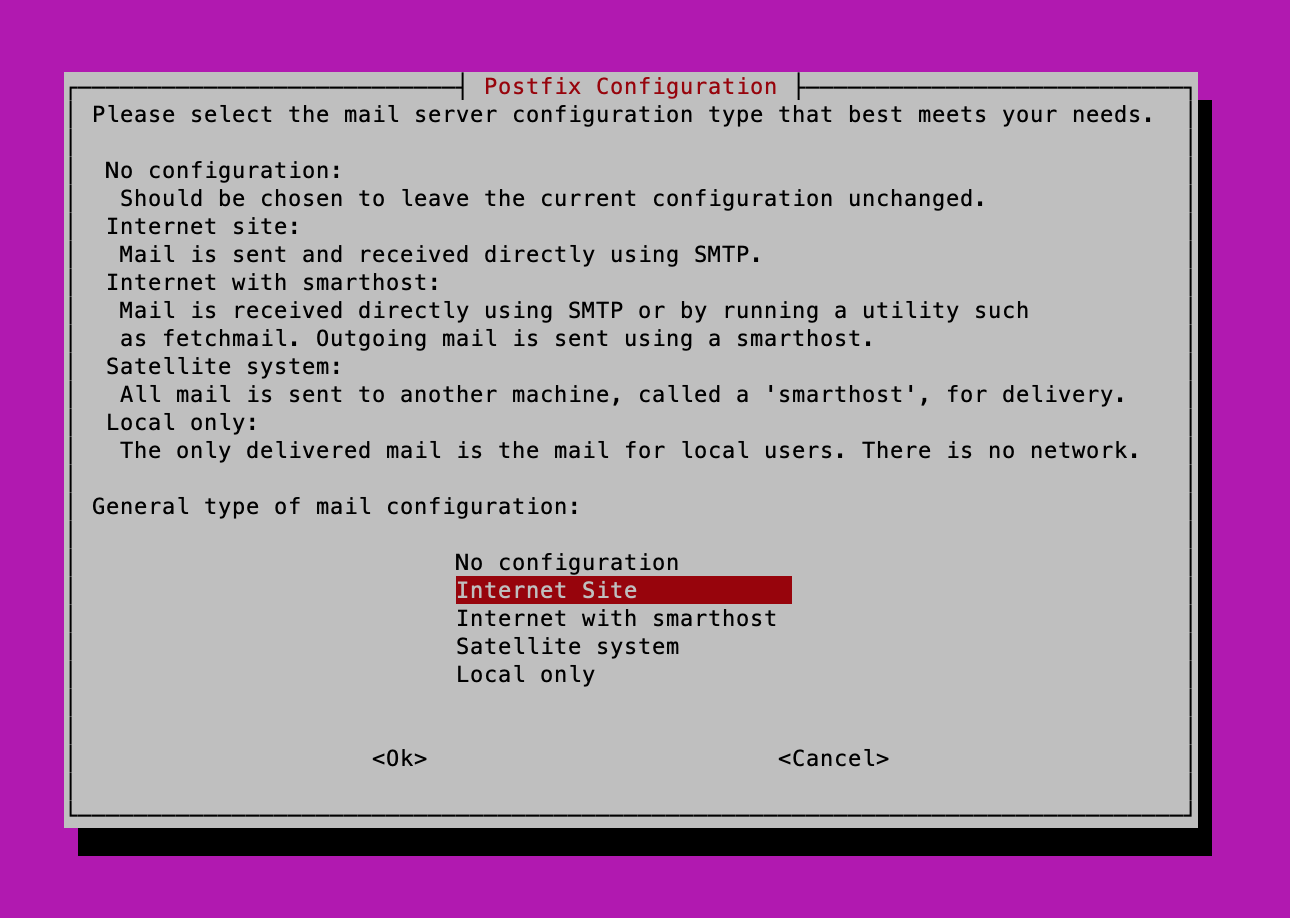
It’s Ok at this point to select any option, as I’ll be providing a very basic postfix main.cf file below.
Paste the contents of main.cf1 below. This will give you a very basic mail relay setup in which only mail originating from the host machine will be forwarded to Gmail.
IMPORTANT
Please be sure to add the correct values for myhostname and the mydomain variables and verify the /etc/ssl/certs/ca-certificates.crt file actually exists.
Create an /etc/postfix/aliases file
Use the following example aliases file example to build your aliases file. Make sure to correct for the <variables> listed within the file.
After creating /etc/aliases, run the following two commands to build the alias database
Gmail App Specific Password Setup
Within Gmail please create an App Specific Password for postfix. You will need the generated password for the next step.
Using Gmail’s App Specific Password within Postfix
Create the sasl_passwd_GMAIL_587 and sasl_passwd_GMAIL_465 files. 587 and 465 refer to ports whereby mail can be relayed via SMTP/TLS or smtps. I’ve included both options here to be thorough. Ensure to replace the <variables> with the correct information. The
Hash the Gmail passwd files created above and add to database
Enable/Start Postfix
Start and enable the postfix service
Test Configuration
Test Configuration by sending a test email
Replace recipient_user@domain.com with the email address to receive the test email, and confirm that the email was received.
Debugging
If there are errors in the process trying to send email, please look in the following locations to see if an error message may give and indication of the problem:
- /var/log/mail.log
- /var/log/mail.err
- journalctl -u postfix.service
You may need to increase the logging level within the master.cf file to generate more output. Please consult Postfix documentation for some useful tips for debugging postfix.
Port 465 vs Port 587
Control of Port Type is made through modification within the /etc/postfix/main.cf file. You should configure postfix to send mail using one but not both ports. Please make the following modifications to main.cf to reflect your port choice
Checklist
- Obtain a FQDN for each “Protected Domain” and {{site.data.links.authelia-domain}}
- Add {{site.data.links.authelia-domain}} to your DNS records
- Obtain SSL certificates for {{site.data.links.authelia-domain}} and for Protected Domains
- Configure Router to Open Ports 80/443 and forward to packets to server running reverse proxy
- Configure server running reverse proxy to forward packets
- Adjust firewall settings on router and server running reverse proxy to allow for incoming traffic.
Contents
- Docker and the use of External Volumes
Docker and the use of External Volumes
Docker is utilized within the authelia setup to provide mysql and redis services. Even the main authelia applicationis run within a docker application
External Volumes or Volumes are used within Docker to maintain persistent data that is intended to be saved between uses of the container. In a nutshell, volumes are used to save the important data created when running authelia. The use of external volumes separates the data from the container itself. The external volume(s) is/are mounted within the docker container at the time of container creation. Data is written to these volumes during use of the container. When the container is stopped or destroyed, the external volume(s) is/are unmounted and the state of the data is preserved.
External Volumes usually refer to directories (which are usually read/writeable) or files (which are usually only readable) within the host system running docker. Volums used in this documentation are:
- /etc/authelia/config/configuration.yml - Main authelia configuration file
- /etc/authelia/config/users.yml - User database of specifying users/groups who are able to register and authenticate with the authelia system
- /var/data/db - mySQL/MariaDB used to store login two factor data
ZFS Setup
Instructions in this section are only relevant if your underlying file system is ZFS,
If using ZFS as the host’s underlying file system, its easy to leverage the zfs’ snapshot capability in order to save versioned copies of the authelia datasets and automate backup of these volumes to another systemrunning zfs.
John Ramsden’s guide1 for setting up ZFS mounts and directories is a great read if you are not familiar with the ZFS concepts and setting up datasets.
If using authelia, I recommend setting up the following zfs datasets (if not already setup):
- etc/authelia
- var/data/db
Using your zfs pool’s name is tank, these datasets could be setup with:
[root]# zfs create -o compression=lz4 -o mountpoint=/etc/authelia tank/etc/authelia
[root]# zfs create -o compression=lz4 -o xattr=sa -o atime=off -o mountpoint=/var/data/db tank/var/data/db
You may need to import/export the pool to prevent later issues:
[root]# zfs umount -a
[root]# zfs export tank
[root]# zfs import tank
Once zfs datasets are setup, you may want to configure the zfs autosnap functionality. Two tools that I use and recommend are zfs-auto-snapshot2 and ZnapZend3. Depending on your linux system, there are packages that are prebuilt:
- Ubuntu
- zfs-auto-snapshot (Available in multiverse respository)
- znapzend (Available as ppa)
- Arch
- zfs-auto-snapshot-git (Available in AUR)
- znapzend (Available in AUR)
Permissions
Discussion regarding Volume/User permission may be needed
References
{% if site.logo %} $logo: “{{ site.logo | absolute_url }}”; {% endif %}
// // Import external dependencies //
@import “./vendor/normalize.scss/normalize.scss”;
// // Import Just the Docs scss //
// Support @import “./support/support”;
// // Import custom color scheme scss //
@import “./color_schemes/dark.scss”;
// Modules @import “./base”; @import “./layout”; @import “./content”; @import “./navigation”; @import “./typography”; @import “./labels”; @import “./buttons”; @import “./search”; @import “./tables”; @import “./code”; @import “./utilities/utilities”;
// // Import custom overrides // @import “./custom/custom”; {% if site.logo %} $logo: “{{ site.logo | absolute_url }}”; {% endif %}
// // Import external dependencies //
@import “./vendor/normalize.scss/normalize.scss”;
// // Import Just the Docs scss //
// Support @import “./support/support”;
// // Import custom overrides //
@import “./custom/custom”;
// // Import custom color scheme scss //
{% if site.color_scheme == “dark” %} @import “./color_schemes/dark.scss”; {% endif %}
// Modules @import “./base”; @import “./layout”; @import “./content”; @import “./navigation”; @import “./typography”; @import “./labels”; @import “./buttons”; @import “./search”; @import “./tables”; @import “./code”; @import “./utilities/utilities”; @import “./overrides”; (function (jtd, undefined) {
// Event handling
jtd.addEvent = function(el, type, handler) { if (el.attachEvent) el.attachEvent(‘on’+type, handler); else el.addEventListener(type, handler); } jtd.removeEvent = function(el, type, handler) { if (el.detachEvent) el.detachEvent(‘on’+type, handler); else el.removeEventListener(type, handler); } jtd.onReady = function(ready) { // in case the document is already rendered if (document.readyState!=’loading’) ready(); // modern browsers else if (document.addEventListener) document.addEventListener(‘DOMContentLoaded’, ready); // IE <= 8 else document.attachEvent(‘onreadystatechange’, function(){ if (document.readyState==’complete’) ready(); }); }
// Show/hide mobile menu
function initNav() { const mainNav = document.querySelector(‘.js-main-nav’); const pageHeader = document.querySelector(‘.js-page-header’); const navTrigger = document.querySelector(‘.js-main-nav-trigger’);
jtd.addEvent(navTrigger, ‘click’, function(e){ e.preventDefault(); var text = navTrigger.innerText; var textToggle = navTrigger.getAttribute(‘data-text-toggle’);
mainNav.classList.toggle('nav-open');
pageHeader.classList.toggle('nav-open');
navTrigger.classList.toggle('nav-open');
navTrigger.innerText = textToggle;
navTrigger.setAttribute('data-text-toggle', text);
textToggle = text;   }) }
// Site search
function initSearch() { var request = new XMLHttpRequest(); request.open(‘GET’, ‘{{ “assets/js/search-data.json” | absolute_url }}’, true);
request.onload = function(){ if (request.status >= 200 && request.status < 400) { // Success! var data = JSON.parse(request.responseText);
  {% if site.search_tokenizer_separator != nil %}
  lunr.tokenizer.separator = {{ site.search_tokenizer_separator }}
  {% else %}
  lunr.tokenizer.separator = /[\s\-/]+/
  {% endif %}

  var index = lunr(function () {
    this.ref('id');
    this.field('title', { boost: 200 });
    this.field('content', { boost: 2 });
    this.field('url');
    this.metadataWhitelist = ['position']

    for (var i in data) {
      this.add({
        id: i,
        title: data[i].title,
        content: data[i].content,
        url: data[i].url
      });
    }
  });

  searchResults(index, data);
} else {
  // We reached our target server, but it returned an error
  console.log('Error loading ajax request. Request status:' + request.status);
}   };
request.onerror = function(){ // There was a connection error of some sort console.log(‘There was a connection error’); };
request.send();
function searchResults(index, data) { var index = index; var docs = data; var searchInput = document.querySelector(‘.js-search-input’); var searchResults = document.querySelector(‘.js-search-results’);
function hideResults() {
  searchResults.innerHTML = '';
  searchResults.classList.remove('active');
}

jtd.addEvent(searchInput, 'keydown', function(e){
  switch (e.keyCode) {
    case 38: // arrow up
      e.preventDefault();
      var active = document.querySelector('.search-result.active');
      if (active) {
        active.classList.remove('active');
        if (active.parentElement.previousSibling) {
          var previous = active.parentElement.previousSibling.querySelector('.search-result');
          previous.classList.add('active');
        }
      }
      return;
    case 40: // arrow down
      e.preventDefault();
      var active = document.querySelector('.search-result.active');
      if (active) {
        if (active.parentElement.nextSibling) {
          var next = active.parentElement.nextSibling.querySelector('.search-result');
          active.classList.remove('active');
          next.classList.add('active');
        }
      } else {
        var next = document.querySelector('.search-result');
        if (next) {
          next.classList.add('active');
        }
      }
      return;
    case 13: // enter
      e.preventDefault();
      var active = document.querySelector('.search-result.active');
      if (active) {
        active.click();
      } else {
        var first = document.querySelector('.search-result');
        if (first) {
          first.click();
        }
      }
      return;
  }
});

jtd.addEvent(searchInput, 'keyup', function(e){
  switch (e.keyCode) {
    case 27: // When esc key is pressed, hide the results and clear the field
      hideResults();
      searchInput.value = '';
      return;
    case 38: // arrow up
    case 40: // arrow down
    case 13: // enter
      e.preventDefault();
      return;
  }

  hideResults();

  var input = this.value;
  if (input === '') {
    return;
  }

  var results = index.query(function (query) {
    var tokens = lunr.tokenizer(input)
    query.term(tokens, {
      boost: 10
    });
    query.term(tokens, {
      wildcard: lunr.Query.wildcard.TRAILING
    });
  });

  if (results.length > 0) {
    searchResults.classList.add('active');
    var resultsList = document.createElement('ul');
    resultsList.classList.add('search-results-list');
    searchResults.appendChild(resultsList);

    for (var i in results) {
      var result = results[i];
      var doc = docs[result.ref];

      var resultsListItem = document.createElement('li');
      resultsListItem.classList.add('search-results-list-item');
      resultsList.appendChild(resultsListItem);

      var resultLink = document.createElement('a');
      resultLink.classList.add('search-result');
      resultLink.setAttribute('href', doc.url);
      resultsListItem.appendChild(resultLink);

      var resultTitle = document.createElement('div');
      resultTitle.classList.add('search-result-title');
      resultTitle.innerText = doc.title;
      resultLink.appendChild(resultTitle);

      var resultRelUrl = document.createElement('span');
      resultRelUrl.classList.add('search-result-rel-url');
      resultRelUrl.innerText = doc.relUrl;
      resultTitle.appendChild(resultRelUrl);

      var metadata = result.matchData.metadata;
      var contentFound = false;
      for (var j in metadata) {
        if (metadata[j].title) {
          var position = metadata[j].title.position[0];
          var start = position[0];
          var end = position[0] + position[1];
          resultTitle.innerHTML = doc.title.substring(0, start) + '<span class="search-result-highlight">' + doc.title.substring(start, end) + '</span>' + doc.title.substring(end, doc.title.length)+'<span class="search-result-rel-url">'+doc.relUrl+'</span>';

        } else if (metadata[j].content && !contentFound) {
          contentFound = true;

          var position = metadata[j].content.position[0];
          var start = position[0];
          var end = position[0] + position[1];
          var previewStart = start;
          var previewEnd = end;
          var ellipsesBefore = true;
          var ellipsesAfter = true;
          for (var k = 0; k < 3; k++) {
            var nextSpace = doc.content.lastIndexOf(' ', previewStart - 2);
            var nextDot = doc.content.lastIndexOf('.', previewStart - 2);
            if ((nextDot > 0) && (nextDot > nextSpace)) {
              previewStart = nextDot + 1;
              ellipsesBefore = false;
              break;
            }
            if (nextSpace < 0) {
              previewStart = 0;
              ellipsesBefore = false;
              break;
            }
            previewStart = nextSpace + 1;
          }
          for (var k = 0; k < 10; k++) {
            var nextSpace = doc.content.indexOf(' ', previewEnd + 1);
            var nextDot = doc.content.indexOf('.', previewEnd + 1);
            if ((nextDot > 0) && (nextDot < nextSpace)) {
              previewEnd = nextDot;
              ellipsesAfter = false;
              break;
            }
            if (nextSpace < 0) {
              previewEnd = doc.content.length;
              ellipsesAfter = false;
              break;
            }
            previewEnd = nextSpace;
          }
          var preview = doc.content.substring(previewStart, start);
          if (ellipsesBefore) {
            preview = '... ' + preview;
          }
          preview += '<span class="search-result-highlight">' + doc.content.substring(start, end) + '</span>';
          preview += doc.content.substring(end, previewEnd);
          if (ellipsesAfter) {
            preview += ' ...';
          }

          var resultPreview = document.createElement('div');
          resultPreview.classList.add('search-result-preview');
          resultPreview.innerHTML = preview;
          resultLink.appendChild(resultPreview);
        }
      }
    }
  }
});

jtd.addEvent(searchInput, 'blur', function(){
  setTimeout(function(){ hideResults() }, 300);
});   } }
function pageFocus() { var mainContent = document.querySelector(‘.js-main-content’); mainContent.focus(); }
// Document ready
jtd.onReady(function(){ initNav(); pageFocus(); if (typeof lunr !== ‘undefined’) { initSearch(); } });
| })(window.jtd = window.jtd | {}); |
{% include js/custom.js %} { {% assign comma = false %} {% for page in site.html_pages %}{% if page.search_exclude != true %}{% if comma == true%},{% endif %}”{{ forloop.index0 }}”: { “title”: “{{ page.title | replace: ‘&’, ‘&’ }}”, “content”: “{{ page.content | markdownify | replace: ‘</h’, ‘ . </h’ | replace: ‘<hr’, ‘ . <hr’ | replace: ‘</p’, ‘ . </p’ | replace: ‘</ul’, ‘ . </ul’ | replace: ‘</tr’, ‘ . </tr’ | replace: ‘</li’, ‘ | </li’ | replace: ‘</td’, ‘ | </td’ | strip_html | escape_once | remove: ‘Table of contents’ | remove: ‘' | remove: '---' | replace: '\', ' ' | replace: ' . . . ', ' . ' | replace: ' . . ', ' . ' | normalize_whitespace }}", "url": "{{ page.url | absolute_url }}", "relUrl": "{{ page.url }}" }{% assign comma = true %} {% endif %}{% endfor %} }bash $ pacman -S docker docker-compose ```
Documentation for Setting Up Webservice
Building Errors {% if page.xsl %}{% endif %}<feed xmlns=”http://www.w3.org/2005/Atom” {% if site.lang %}xml:lang=”{{ site.lang }}”{% endif %}>